Everything You Need to Know About Stamps
learn cardmaking series
everything you need to know about stamps…
The next few articles in my LEARN CARDMAKING SERIES will specifically focus on everything you need to know about stamps. The different types that are available in the market today, how to use them, other items you will need to be able to use some of them, different ways to use them, how to clean and care for them and the best way to store them. Then we will look further at ink and paper, and other essential tools and items in future articles.

types of stamps…
When I think about stamps, I remember the wooden blocks with carved red rubber images, glued on a foam cushion on one side and a sticker of the image on the other side. As kids, we used them in school with our teachers’ office ink pad and as a crafter I continued to see and purchase them to use at home. Modern stamps are still made from carved rubber images and come in a wide variety of colours, ranging from red, pink, blue and grey, although red seems to be the most common. Rubber stamps are mostly available to purchase in three different options:
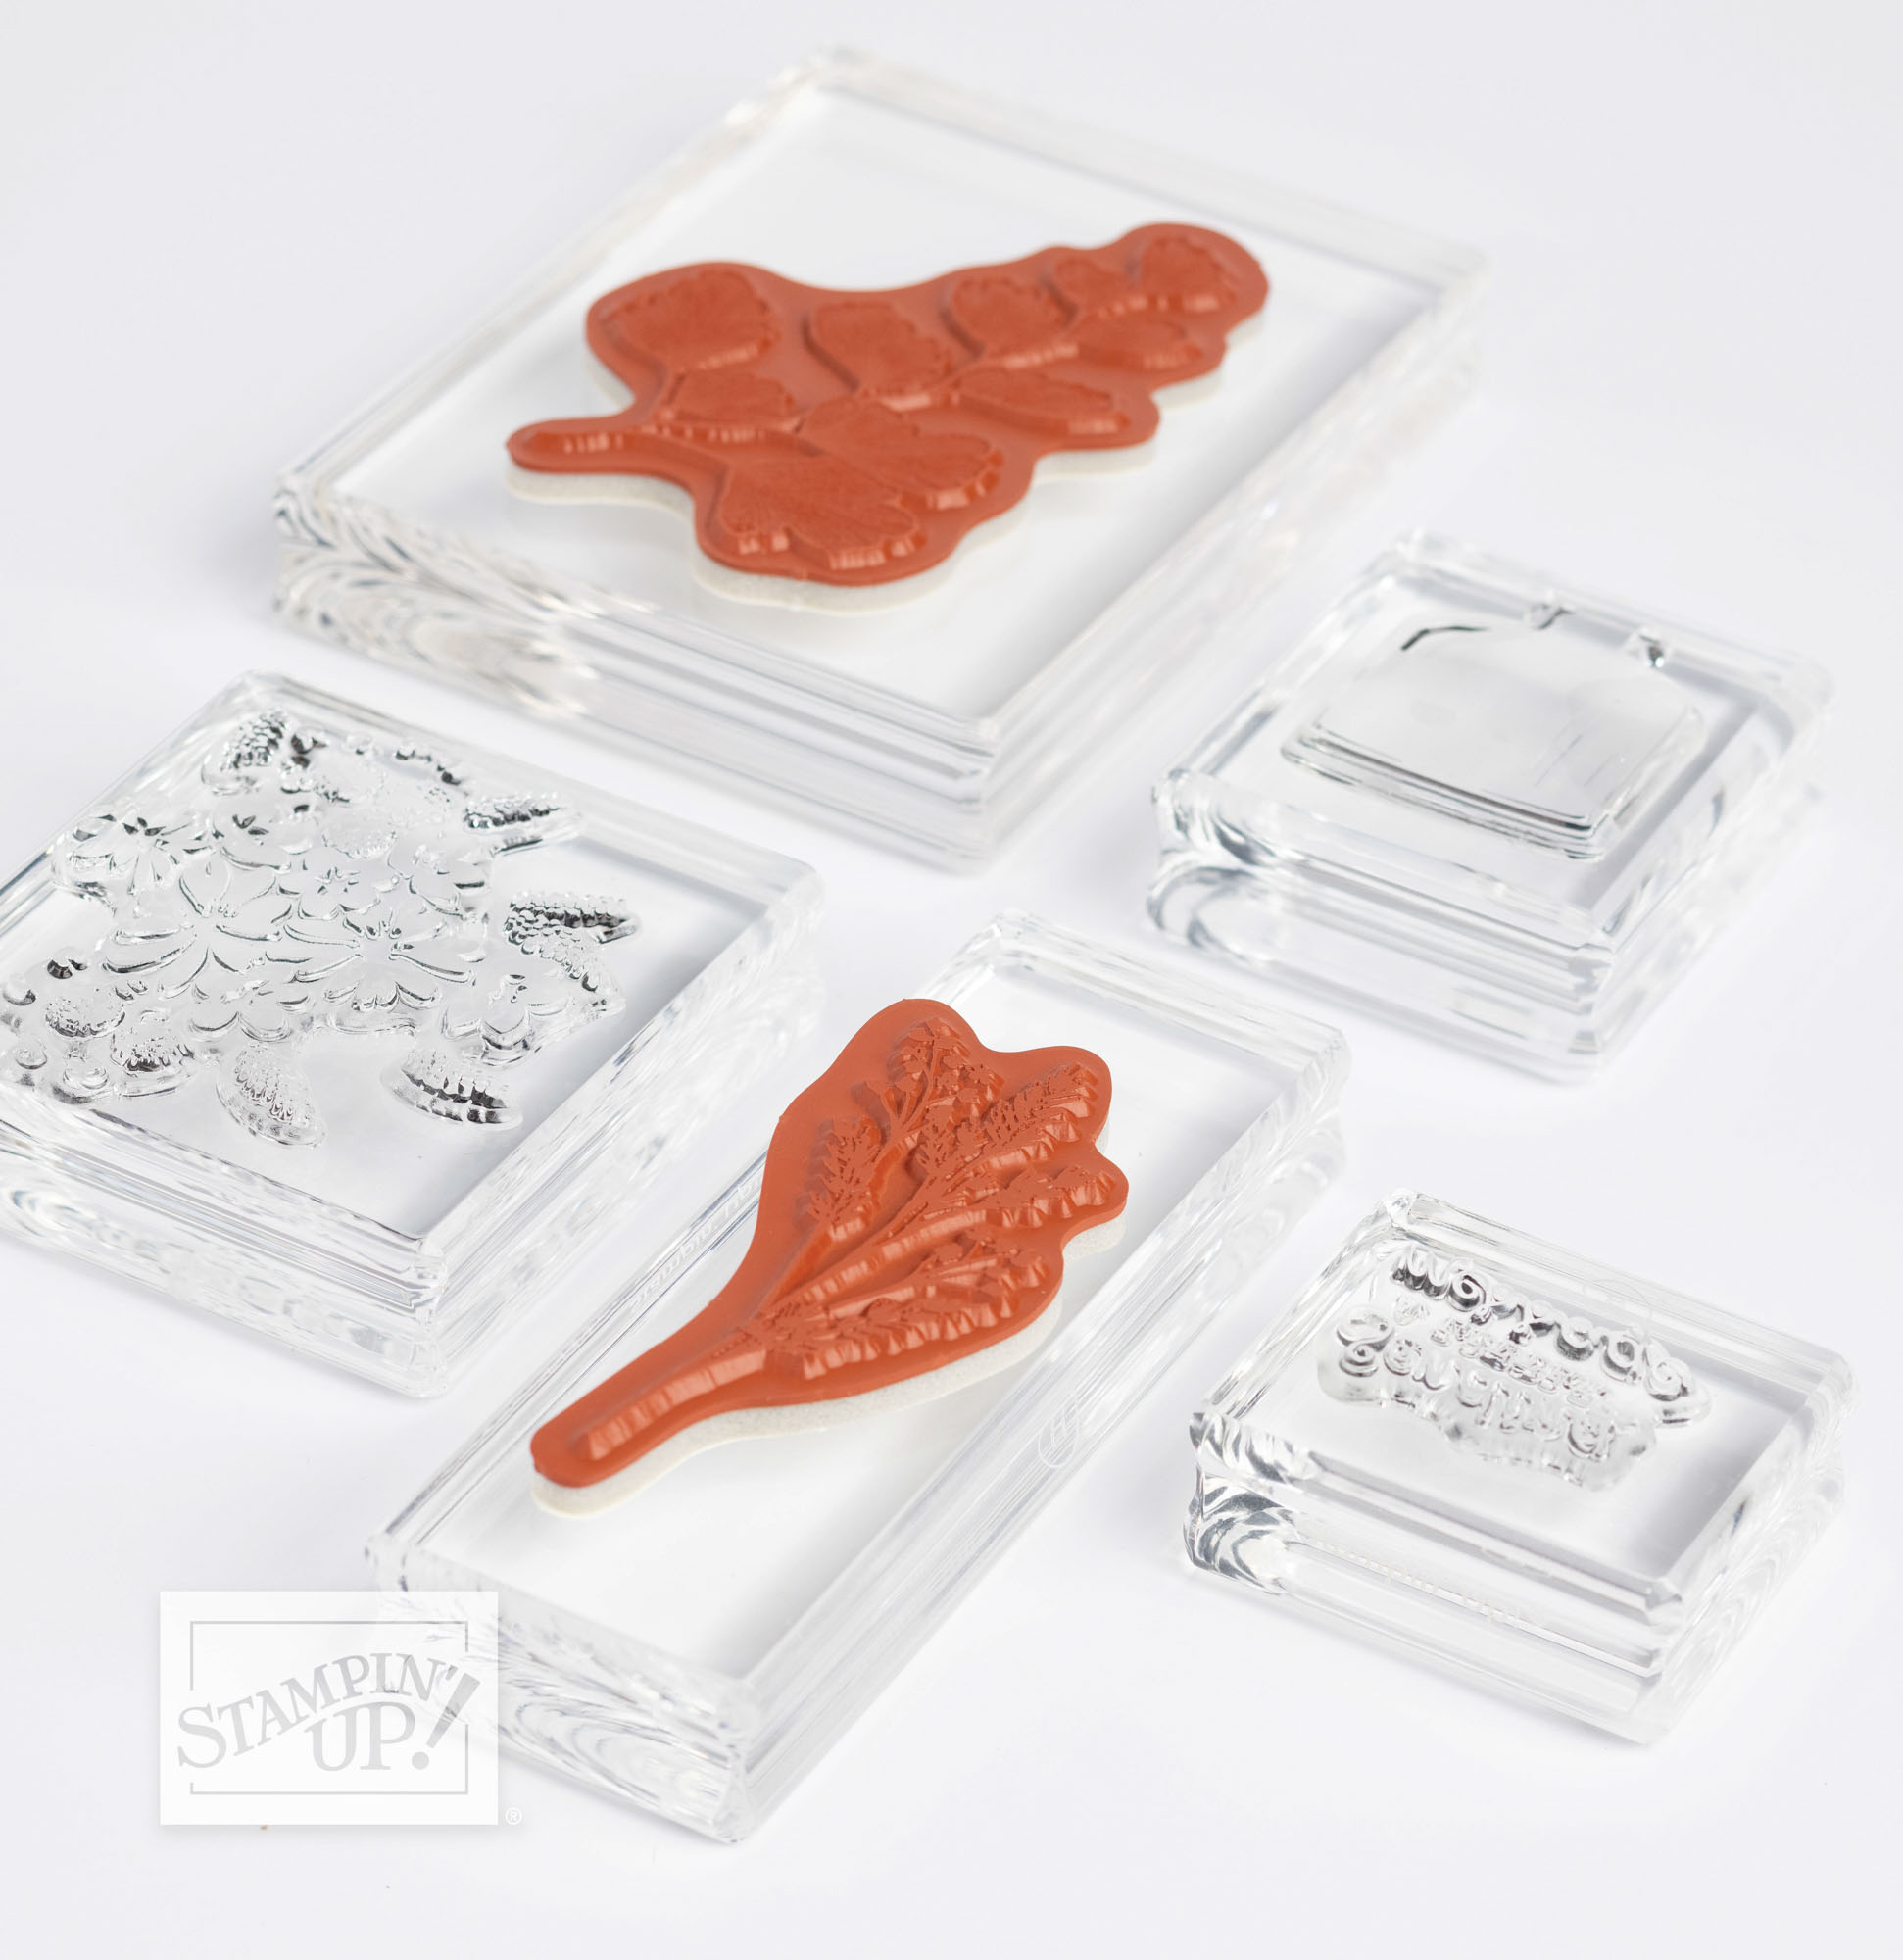
wood mount/mounted
The carved rubber image is mounted on a foam cushion and then adhered to the wooden block. A sticker is usually found on the opposite side to help with knowing where the image is located. Some stampers still prefer wood mount stamps, but this is becoming less common.
If you find a particular image or stamp set that you really like but it is only available in wood mount, it is possible to unmount them (i.e. remove the stamp from the wooden block) and there are many tutorials around that show exactly how to do this. It is not something that I have ever done before.

cling mount/mounted
More frequently these days, carved rubber images are just adhered to the foam cushion and no longer need the wooden block because they are now designed to temporarily attach to reusable acrylic blocks. This type of stamp is called cling mount – because they cling to the block. They still require a sticker label but you just attach that to the back of the stamp when you get your set. Don’t worry, I can show you how.
This is the most widely used type of rubber stamp nowadays because the lack of the wooden block means they take up less space on the shelf, making it easier to store, therefore a favourite among stampers.
unmounted
Rubber stamps are also available as unmounted, which means you literally just get the carved rubber image. These types of stamps are also used with acrylic blocks, but require the application of a special removable or two-way adhesive to get them to temporarily stick to the block – although this can be a messy process, leaving sticky residues both on the rubber and block.
It can be hard to get good, clear stamped images from unmounted stamps, presumably because they don’t have the foam cushion to help keep even pressure and uniform contact from the stamp to paper/card. This can be aided by using a foam stamping pad (or piercing mat) beneath the paper/card.
It is also possible to mount an unmounted stamp on to a foam cushion and make it into cling mount. Again, there are many tutorials around that show how to do it, as I’ve not needed to do this before.
There are also some new kids on the block – Acrylic and Photopolymer. They both still need an acrylic block to attach to but they don’t have any stickers because they are completely transparent, you can see straight through. This opens up whole new ways of stamping (more on that below). Being completely see-through gives you, the beginner stamper, a HUGE advantage of being able to see exactly where the stamped image will be on your project and a greater chance of successful outcomes with your projects.
Acrylic
When compared to Photopolymer, Acrylic is sometimes referred to as being inferior – lower quality, less durable and cheaper because they are mostly manufactured in China. They are often found as ‘freebies’ attached to cardmaking magazines (although this is not always the case) and can be a good place to start for beginners. In fact, that’s where most beginner card makers and stampers do start.
Acrylic stamps do feel different in the hand. The material is softer, more stretchy and can easily be torn if you’re not careful when removing them from storage sheets. I always advise that to remove any clear stamps from their storage sheets, it is best to lift and roll from one edge and then continue to roll to peel it off. This reduces the chances of a stamp being stretched or pulled and torn.
Acrylic stamps also behave differently with some inks, so have gained a reputation for being difficult to use across the board. This can be extremely frustrating for beginner stampers and quite possibly the biggest reason that acrylic stamps are not so great for beginner stampers. It is true that some inks will create beads on the surface of the stamp, therefore they will not give a uniform, crisp image when stamped and look blotchy and uneven, but there are ways around this and with experience, acrylic stamps can be great additions to your stamp collection.
photopolymer
By comparison, Photopolymer stamps are considered higher quality and more durable over time than Acrylic stamps. It is thought too, that they are more expensive because they are generally manufactured in the USA.
The differences between Photopolymer and Acrylic can be felt in the hand. Photopolymer feel heavier and are slightly less stretchy, almost stiffer. They also appear more clear or transparent and shiny, and have a distinct odour or smell to them when you first open the case/packet. This is quite possibly because they are said to have a higher ratio of resin in their formulation.
Photopolymer can also feel quite sticky to the touch and they seem to cling to blocks more easily. I also think this is what helps ink to stick on the surface of the stamp rather than create beads, and then it transfers beautifully from stamp to paper/card, leaving a clean, clear, crisp image. Which is just as easy for a beginner stamper to achieve too.
It is important to note that both Acrylic and Photopolymer stamps will stain over time with constant use, regardless of how you clean or care for them. This does not affect the way the stamps stamp, nor the images they produce. It has been said that Photopolymer will stain more easily than Acrylic, although I have yet to determine if this is true or not.
types of images…
Another important thing to know, when you’re learning everything you need to know about stamps is that there are basically two different types or formats for the images across all the types of stamps described above, being: line or outline, and solid or bold images. I find the easiest way to understand the difference between these two types is to look at an example for each one to compare.
solid/bold images
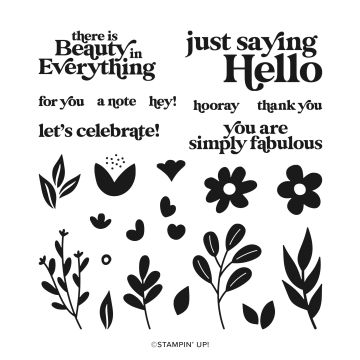
Notice how these images are all solid? If you use black ink, they will stamp just as you see them pictured here – all black. The only way to get colour in these images is to stamp using a coloured ink.
Because they are easy to use, stamp sets with solid images are fantastic for beginner stampers. You don’t need to have artist-level colouring skills, nor do you have to have a large supply of various specialty colouring mediums, you just need a few different coloured inks to stamp with.
line/outline images

Whereas outline images are exactly as their name suggests – it is the image drawn in outline, similar to what you would find in colouring books.
You can stamp these images with black or coloured inks, but they will need to have colour added in some other way to cover the white space that is inherent to this type of image. Inevitably, this involves additional supplies being required for colouring and/or some artistic colouring ability – either or both of these can be challenging for beginner stampers, but easily remedied with time and practice.
*These stamp sets are from the Stampin’ Up! 2022-2023 Annual Catalogue. They may or may not be available depending on when you are viewing this page. They remain here because they still serve the purpose of showing the differences between solid and outline images. Please contact me or refer to current catalogues to see new offerings in both of these styles.
You may also find that some stamp sets contain a combination of both types of images and that’s a great way to try them both out. I generally recommend beginners try to find solid image stamp sets for the reasons mentioned above, but if the stamp set you choose has a combination of image types, one way of incorporating colour into the outline images without fancy schmancy colouring methods is to just stamp them on coloured card. Those little elephants above, stamp them on grey cardstock. Instantly coloured. No extra colouring supplies needed. No extra expenses added. No stress felt. Easy peasy.
but wait there’s more…
A recent innovation that incorporates both outline and solid types of images, not only in one stamp set but combined to create one image is called two-step (or three-step) stamping. These types of stamps have an outline image, say a flower, that you can stamp in either black or another colour and then a second solid or bold stamp that creates the infill, essentially colouring-in the flower. Sometimes, there’s even a third stamp that gives added details. You should be able to see what I mean in the following examples.
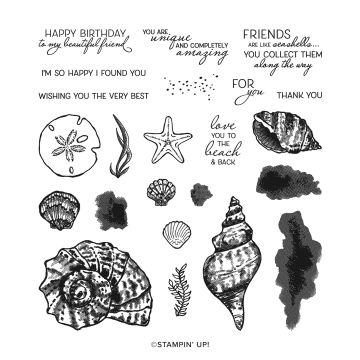
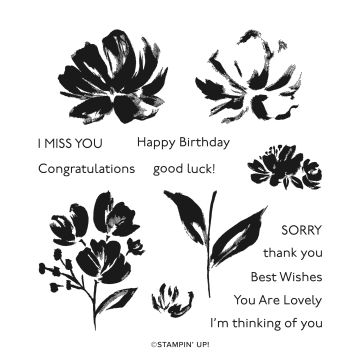
In Painted Poppies, the large, solid blotch shape can be used to easily stamp over the outline images to give them colour. It is not a perfect match but that could be considered deliberate because it adds texture and interest.
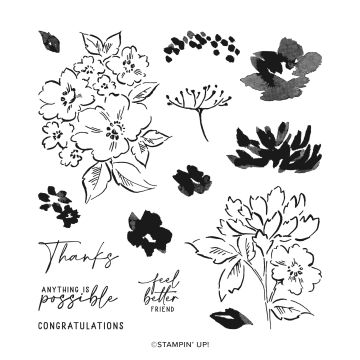
The solid stamps in Hand-Penned Petals are a better match to the outline images. The three scattered solid flowers fit perfectly to colour the largest three flowers in the top left arrangement. Either of the two smaller solid flowers will also colour the smallest flower of the bottom right arrangement. There is also a solid infill for the leaves and the arced spotted one fits onto the stem below it, not so much an infill but certainly contributing to the final image result.
Additionally with Hand-Penned, these solid infill stamps are able to be stamped as flowers or leaves on their own and still be recognised as flowers and leaves. An added benefit of some two-step stamp sets.

*These stamp sets are from the Stampin’ Up! 2022-2023 Annual Catalogue. They may or may not be available depending on when you are viewing this page. They remain here because they still serve the purpose of showing how solid and outline images can be combined together in two-step stamping. Please contact me or refer to current catalogues to see new offerings in these styles.
Some two-step stamp sets are solid images only, where each of the solid images combine to create additional detail in the overall stamped image. You don’t always need the outline.
You can see in Christmas Season that most of the images have a second, similar shaped but smaller image that will give greater detail when each is stamped in different shades of the same colour – using the larger image for the palest shade and smaller image for the darkest shade. This creates interest by mimicking shadows to give depth and texture.
Art Gallery is similar but also an example of three-step stamping. The top two flower heads combined with the smaller image at the bottom centre, can layer together to create a single flower head.
*These stamp sets are from the Stampin’ Up! 2022-2023 Annual Catalogue. They may or may not be available depending on when you are viewing this page. They remain here because they still serve the purpose of showing how solid images alone can be used in two- or three-step stamping. Please contact me or refer to current catalogues to see new offerings in these styles.
Two-step (or three-step) stamps are only available in Photopolymer (by Stampin’ Up! and some other stamp companies) or Acrylic (by other stamp companies). They must be in this transparent format because you need to be able to see-through to align the images correctly.
Having said that, Painted Poppies is NOT a Photopolymer stamp set. It is included here because whilst it isn’t a true two-step stamp by definition, it shows that some carved rubber stamps are able to perform this function in a small way.
You will also notice that some of the solid stamps are not really that solid in their formation. There are areas of dark and light in those stamped images. This is an additional feature element from the design artists that adds further depth, texture and shadow, therefore interest. This attribute is often welcomed by beginner and seasoned stampers alike, as it helps ALL to create artistically beautiful projects without a lot of knowledge, experience or expensive specialist supplies.
and just when you thought that’s everything you need to know about stamps…
Stampin’ Up! create a new style of stamp!
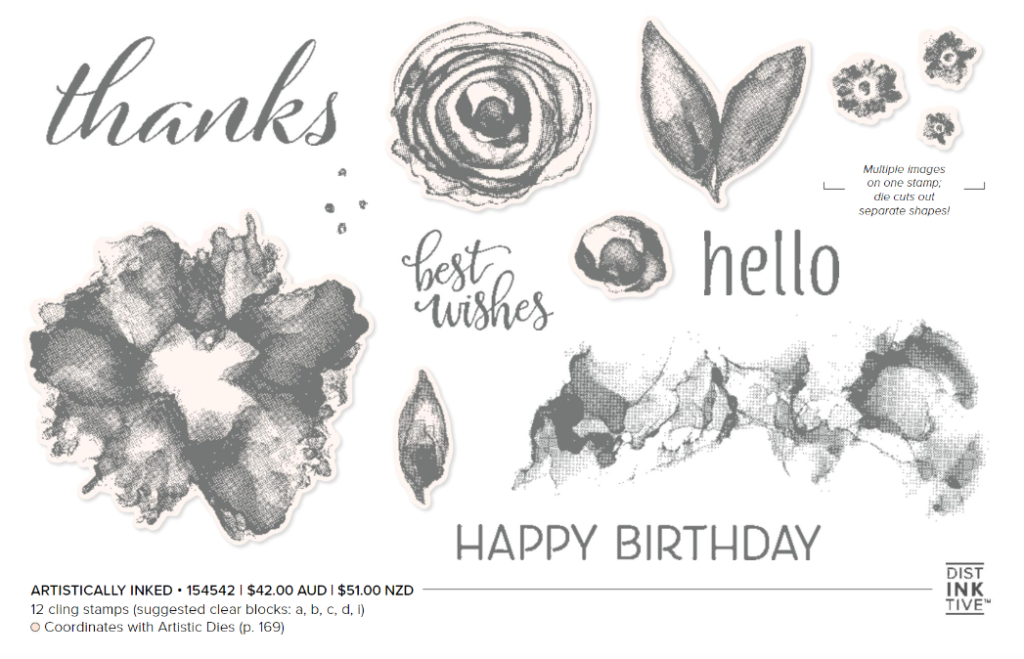
DistINKtive (patent pending) stamps have a innovative surface texture that gives even more depth and dimension in a single step, a single stamp. DisINKtive stamps seem to hold the ink and lay it down differently, in such a way that the shadows and dimension achieved give an almost photo-realistic image. Again, in just one step. You can clearly see the different opacities in the stamped images produced.
DistINKtive stamps are available in both red rubber cling mount and photopolymer. They are easily identified in any of our catalogues by the icon that you can see displayed here for the Artistically Inked stamp set in the 2022-2023 Annual Catalogue.
New DistINKtive stamps are being added to the offering with each new catalogue. Be sure to check back frequently to see what’s new.
so, are you ready to choose your stamps..?
There are SO many stamp sets of ALL types in our product catalogues, all you have to do is choose the ones you like most.
Sounds easy, right? Good luck!
If you’re anything like me – you pretty much like them all, so choosing just one (or two) is really, really hard!
I hear you! What I always recommend is for you to think about the type of cards you want to make and send. Then look to find sets that have images and sentiments that meet those needs.
Alternatively, look for sets that have images which can be used for lots of different occasions, and then a variety of general sentiments as well. They may be mixed sets (images and sentiments), image only sets or sentiment only sets. The choice is yours, but don’t be overwhelmed.
Here are some of my current favourites, in addition to those already mentioned above…